
Wheel balancing
f you change your own tires at home and your bike isn’t used purely off-road, you really ought to finish the job. It doesn’t make much sense to save the cost of R&R, but still have to carry the wheels to the shop to get them balanced. Conversely, even if you only have a pro swap your tires, it’s good to be able to perform a balance assessment and adjustment between changes. Your car’s tires (ideally) get rotated and rebalanced multiple times between replacements, even when they don’t sling off wheel weights, since normal wear alters the wheel/tire balance equation and detracts from a smooth ride. While periodic rebalancing is less of a necessity on motorcycles, balancing weights can be lost at any point in a tire’s life, leading to annoying—and potentially unsafe—vibration and uneven wear. If you can take care of this at home, you’ll avoid the cost and hassle of a trip to the shop.
It’s true some dual-sports come from the factory without wheel weights installed, just like their dirt bike counterparts, but this doesn’t mean balancing is inappropriate or unnecessary for their wheels. Off-road riding generally occurs at slower speeds than street travel, and the irregular surfaces involved create much more drama than an out-of-balance wheel, so there’s little or no advantage to balancing for bikes ridden only in the dirt. However, dual-sports used on tarmac, especially at highway speeds, can benefit a great deal from this process. Maybe you’ve wanted or tried to balance your dual-sport’s wheels, but found it difficult or impossible to do so with the weights commonly used on street wheels. We’ll cover an excellent option for spoke wheels, whether they’re on a dual-sport, ADV, or street machine.

First of all, what’s the point?
The finest wheels and tires may offer valuable features, but they still come with manufacturing imperfections that make some spots heavier than others. You might be surprised to see just how far out of balance a new/undamaged premium wheel can be, even without a tire on it. In many cases, it’s a safe guess the valve stem’s extra weight will make a cast or forged wheel heaviest at that point. The uniform circumference of a tire, on the other hand, doesn’t give away any such info—unless you know where to look. Many high-quality tires have been tested at the factory and dabbed with paint (a yellow, white, or red dot on the sidewall) to indicate where they’re lightest. Savvy installers know to align this dot with the valve stem, so the heaviest spot on the wheel is at least partially offset by the lightest spot on the tire, thereby allowing the use of less total weight for balancing.
We’re only talking about an ounce or two in many cases, which may seem insignificant. Yet even slight variations can create sizable oscillations when orbiting a central axis at high speed, since centrifugal force increases with rotational velocity. (And yes, physicists and engineers, I realize centrifugal force is merely an apparent force, but please allow this common usage here.) Of course, the problematic manifestations of this force also increase with the weight of any irregularity, and it’s not uncommon for a wheel/tire assembly to be out of balance by many ounces. The heaviest part of the combo tries (apologies again for this anthropomorphism) to pull the whole thing in its own direction as it’s slung around the axle. Hence, the wheel and everything attached to it—tire, axle, suspension, and ultimately bike and rider—are actually forced upward when the heavy spot is up, and downward when it’s down. Regardless of the surface over which it’s traveling, an out-of-balance wheel and tire are essentially bouncing at the frequency of their own rotation.

This action is typically felt as vibration by the rider. It also yields uneven wear and inconsistent traction, as the tire is yanked up away from the ground one moment and then flung down against it the next, even on a perfectly smooth and level surface. While the effect may be unnoticeable at low speeds, the amplitude of this bouncing action increases drastically with wheel rpm. Proper balancing prevents this and maximizes tire life, traction, suspension function, and rider comfort and control. It is achieved by simply adding weight on the wheel to the lightest areas with the tire in place, thereby negating the force advantage of heavier spots as they all tug outwardly during rotation.
Okay, what do I have to buy?

The fancy machine used to balance your car’s tires spins each wheel at high speed and detects where centrifugal forces are greatest using sensitive instrumentation and computerized analysis, then indicates where and how much weight the technician should add to the rim. Motorcycle dealers may use similar machines, but the job can be done just fine with much simpler technology by the home mechanic. Depending on features and quality of construction, wheel balancing stands are available at many price points (good ones start at $80-110). Some have attachments for measuring lateral and radial wheel runout, and a runout gauge can be clamped to a balancing stand lacking such a feature. Although we won’t cover wheel truing in this article, checking runout is a prudent step in the balancing process, since a bent or out-of-round wheel will not balance properly and may be dangerous to use.
A balancing stand’s primary function is to allow extremely free and even wheel rotation, often through the use of paired ball-bearing-equipped rollers atop two uprights, cradling the ends of a metal bar serving as a substitute axle. Together, these elements minimize friction and sources of inconsistency as the wheel turns. When it’s given a gentle spin by hand, the wheel eventually comes to rest on the basis of how its weight is distributed around the circumference, with the heaviest spot at the bottom. A wheel still mounted on a motorcycle won’t enjoy the same freedom when suspended off the ground, since friction will vary at different positions on its (actual) axle and brake components will drag against each other, if only very lightly. Bottom line: get a balancing stand. Better yet: share the expense with riding buddies, since you won’t all need it at the same time.
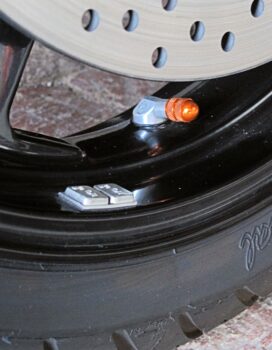
With a balancing stand purchased, next you’ll need wheel weights. These come in various styles and are available from most any motorcycling supply source, starting at less than ten bucks a box. Some are small, flat adhesive-backed metal plates that stick to a wheel rim’s broad, gently arcing surface (facing inward toward the hub). Others clip onto a central rib that runs around the rim’s circumference. Still others get crimped onto wire spokes. Some are available in a wide range of sizes, while others are all a fixed size and must be combined and/or trimmed for precise adjustment. Because of its great density, malleability, and the ease with which it could be cut down in small increments, lead was the wheel weight material of choice for eons. Health concerns and associated regulations have eliminated lead weights from the marketplace, though some crusty old wheel balancers still save and reuse them. Now weights are most often steel or brass—presumably safer to eat than lead (!), but definitely inferior for wheel balancing. Such weights require more volume to equal the mass of their lead equivalents and trimming is difficult or impossible. Weights may be bare metal, chromed, nickel-plated or black.
Got it—what now?
Balancing stands typically come with an assortment of heavy rods in common axle diameters, though sometimes these must be purchased separately. Select the one matching the inner diameter of the wheel bearings, which should remain in place after the wheel has been removed from the bike and thoroughly cleaned. Confirm smooth, easy rotation of those bearings and the stand’s rollers. Insert the rod through the wheel bearings and lay it across the rollers, with the wheel centered between the uprights so there are no points of contact. Other balance stand designs utilize half-axles with cones that wedge into the wheel bearings from each side; these are one-size-fits-all and automatically center the wheel in the stand; still others support the wheel from only one side. With the wheel mounted in the stand, carefully examine your tire, checking for odd wear patterns, punctures or other damage. Debris stuck in your tread will definitely create an imbalance!

Note: what follows is the general procedure for all wheels, but the details are for cast or forged versions. See the final section for spoke-specific steps.
Now give the wheel a nudge just hard enough to send it through several full revolutions. Be patient and watch where it comes to rest. Imagine the valve stem is on a clock face and take note of its position. Spin the wheel again and see where it stops. Take note and repeat once more. If the valve stem ends up in a different place at the end of each spin, the wheel is already balanced. Since it’s coming to rest randomly, no point around its circumference is exhibiting a weight advantage. Count yourself lucky—you’re done.
Alternatively, if the valve stem repeatedly ends up in the same position, you can assume the associated low point on the wheel is a heavy spot and must be offset with added weight on the opposite (high) side. First, check any wheel weights currently installed. If they’re near the heavy spot, you might be able to achieve (or at least improve) balance by removing some or all of them. Perhaps a weight has been inadvertently shed. Look for adhesive residue near the high/light point. Maybe you can just replace the lost piece (after cleaning the spot thoroughly). In any other case, it’s probably best to remove all installed weights and start fresh.

With practice, we can discern how close a wheel is to being balanced by how it behaves at the conclusion of its rotation. When it comes to rest very gradually without reversing direction at the end, success is near or already achieved. If, instead, the wheel flops quickly in one direction or backtracks after coming to a momentary halt, there’s still more work to do. In any event, the procedure is the same: guess how much weight is needed and add it to the wheel’s high/light point with some temporary means, reserving more permanent mounting for the finalized arrangement. You can employ a bit of lightweight tape for this, or just use old adhesive-backed weights that are no longer sticky enough to stay on in real-world use, but will hold well enough during balancing. Check your guess with several more spins, then put new weights in their place after you’ve established the correct amount.
In many cases, the above process will be straightforward, with only one to three weights required in a single spot (divide multiple weights between left and right sides of the wheel). In less fortunate instances, each additional weight will seem to reveal a new imbalance; your wheel may end up with weights all over it and still not be right—very frustrating! Breathe deeply, take a break, remove all the weights, and start over. Check again for any interference with the free motion of the wheel. Experiment with symmetrical weight positions on both sides of the suspected light spot. For example, rather than put two ounces at noon on the rim, try putting one ounce at both 11:00 and 1:00. Spreading out the weight like this can soften the effect and minimize the creation of new problems.

A particularly challenging wheel may truly have several heavy spots necessitating placement of weights at multiple points around the wheel, but the goal should be to condense the number and location of weights used to the fewest possible. Practice and patience will pay off. Count the time and angst required for trial-and-error learning as necessary tuition. The work required here can be a bit tedious, but it’s not difficult. We must accept the occasional annoyance of chasing what seems like an invisible moving target; it will eventually be found.
With the proliferation of tire pressure monitoring systems (TPMS), newer motorcycles may sometimes require an alarming amount of weight to properly balance the wheels. BMWs with the OEM TPMS have a fairly large attachment inside the wheel at the valve stem opening; indeed, the tire pressure monitor (TPM) includes the valve stem. This creates an obvious artificial heavy spot on the wheel, and while it can be minimally offset by ensuring the heavy spot on the tire goes opposite the TPM, balancing a wheel so equipped will require both additional patience and additional weight.
About those spoke wheels…

Whereas the rims on cast or forged wheels are wide enough to accommodate stick-on weights, those on spoke wheels are usually too narrow. Weights that attach to the spokes themselves are required, instead. Some weights designed for wire-spoked street wheels don’t fit securely enough to be trustworthy during off-road hammering. They may be meant for larger gauge spokes than those found on a dual-sport wheel, or they might end up sliding along the length of the spoke because they were merely crimped onto the nipple. While this may not strictly apply to all spoked BMW wheels, which often have outside-the-bead spokes and thus plenty of room to affix stick-on weights, it simply means ADV riders may have more than one option when it comes to wheel weights.
A superior solution is available: weights that slip over the spoke and are secured with set-screws (don’t forget to use threadlocker!). These are infinitely reusable, and can be quickly popped on and off during the balancing process to make fine-tuning easier. Several manufacturers make this type of weight, but for the home mechanic, I recommend those from NICECNC (“Nice CNC” – get it?) because they come in conveniently small assortments instead of having to buy each size in bulk or individually. Available on Amazon, the NICECNC packs range from $22.99 for an eight-piece set to $87.99 for 36 pieces. The 14-piece set, at $34.99, should be more than adequate for balancing two wheels and contains weights from 0.25 to 1.5 ounces.


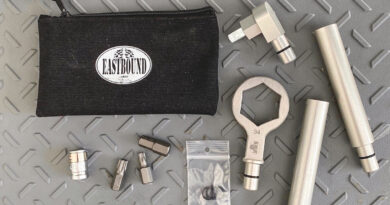
The Marc Parnes balancer is a really well made product. The embedded video showing the balance process left out an important part. The adapters that lock the wheel to the balancer each have a thumbscrew to hold it in position. It is important to make sure that you place each adapter with the thumbscrew placed 180 degrees apart, otherwise the thumbscrews will affect the balance. Marc includes this instruction with his product, but it wasn’t mentioned in the video.